Introduction
As enterprises move to cloud there is a need to connect cloud-native applications with on-premise legacy systems. Multi-Cloud architectures allow you to build solutions spanning more than one public cloud by combining best of breed capabilities creating an increasing need for interconnecting these clouds. For example, you may want to use the Google App Engine to deploy your app but for your backend prefer Oracle ATP database hosted on Oracle Cloud.
Each public cloud provides multiple connectivity options from dedicated high speed interconnect to using VPN based technologies to connect to on-premise using IPSec based connections that use public internet but provide secure connectivity.
Oracle OCI offers service called
VPN Connect for site-to-site connectivity between an on-premise network with OCI VCN using VPN based on the IPSec protocol.
In this blog, I will outline steps for configuring VPN between Oracle OCI Private Subnet with Google GCP VPC. VPN using IPSec is a cost-effective way of connecting these networks over public internet obviating no need for expensive lease lines and such. Steps outlined here also apply if you are trying to connect your on-premise network with either of these two cloud service providers.
Note that I will focus on Site-to-Site connectivity based on IPSec protocol and use out-of-the-box functionality for VPN provided by these two cloud providers. You can also use other VPN implementations such as open-source
Strongswan and
Libreswan.
Concepts
VPN - Virtual Private Network is connectivity between two networks to allow secure transmission over public and un-secure networks using RFC 1918 (private) IP addresses. Data is encrypted to ensure privacy and authenticated at the origin and destination.
Site-to-Site VPN - Restricts connectivity to certain IP address only.
IPSec - Stands for IP Security. It defines a suite of security protocols that can be used by two networks to address authentication, integrity, and confidentiality (Wikipedia link)
BGP - A protocol for efficiently routing packets between two independent networks (called Autonomous Systems) on the internet.
Tunnels - This is one of the two modes for configuring IPSec. In this mode IPSec encrypts and authenticates entire packets and then the packet is encapsulated to form a new packet with different header information. The other mode - Transport mode - only encrypts the payload. OCI supports Tunnel mode.
BGP - Border Gateway Protocol is one of the common protocols used for IPSec tunnel. It supports static and dynamic routing. OCI support both. For BGP dynamic routing new routes are advertised and automatically learned. This blog outlines Static Routing.
For this blog, I created the following two utility VMs on OCI and GCP with configurations as noted at the start. Note the CIDR ranges and IP address that will be used throughout this article. Pls, refer to previous articles on my blog if you need details on how to create these VMs.
Convention: Configurations that are used across clouds are highlighted using the following color scheme.
GCP: blue
OCI: red
OCI VM/Network Configuration
VCN: oci-gcp-vpn-demo
Region: us-west (Phoenix)
Subnet: private_subnet1
CIDR: 10.0.1.0/24
VM instance name: instance-1
Private IP: 10.0.1.2
GCP VM/Network Configuration
VPC: gcp-oci-vpn-demo
Subnet: subnet1
Subnet Region: europe-west1
CIDR: 192.168.0.0/16
VM instance name: instance-1
Public IP: 35.241.162.54
Private IP: 192.168.0.2
High-Level Steps
- GCP - Create VPN Gateway
- OCI - Create Dynamic Routing Gateway (DRG)
- GCP - Configure VPN Tunnels
- Route Config - GCP and OCI
- Firewall Configuration - GCP and OCI
GCP VPN Configuration
Here we will create a VPN Gateway and configure two tunnels.
VPN Gateway: vpn-1
Static IP Address: 34.105.69.38
Go to Networking -> Hybrid Connectivity -> VPN
Here I will use the wizard and select the Classic option. Note that Classic supports both Static and Dynamic Routing but does not support HA.
Click on Create VPN Connection to continue
Supply a name and select the VPC network (gcp-oci-vpn-demo) and same region (us-west1) and click Create IP address under IP Address dropdown to create a static IP address
Give a name and click RESERVE
Note the public static IP address: 34.105.69.38
Configure the tunnels
This step requires OCI tunnel IP addresses so will be performed after configuration of OCI VPN Wizard
OCI VPN Configuration
Tunnel 1: 129.146.13.63
Tunnel 2: 129.146.12.60
Go to Networking on left menu
Click on VPN Connections and Click on Start VPN Wizard
Steps
- Create a Customer Premise Equipment (CPE) which is a virtual representation of On-Premise (GCP in our case) router device
- Create Dynamic Routing Gateway (DRG) and configure to use CPE from the above step
- Create IPSec Connection for DRG
- Attach DRG to the VCN
- Update Route Table to use the DRG
Fortunately, the latest upgrade of OCI has simplified this quite a bit and all of the above can be configured using with a wizard.
Here are the screenshots of wizard configuration:
Enter the Static Public IP of GCP VPN Gateway - 34.105.69.38 (refer section GCP VPN Config above) and click Next
Select Static Routing. Enter GCP VCN Subnet IP - 192.168.0.0/16
For Tunnel configuration enter tunnel-1 and a shared secret (let's say, ocigcpvpn)
Repeat the above and create a second tunnel. Use the same secret.
For VCN select existing and choose oci-gcp-vpn-demo created before
Choose Private Subnet created earlier - private_subnet1
Review and Confirm
Note the next steps
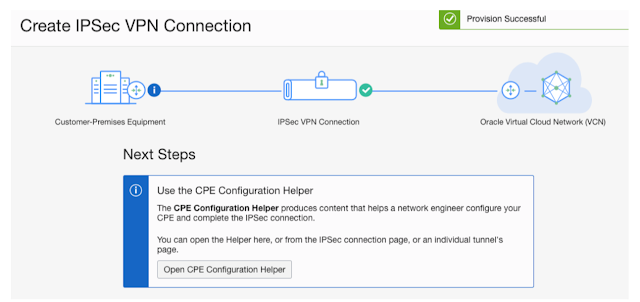
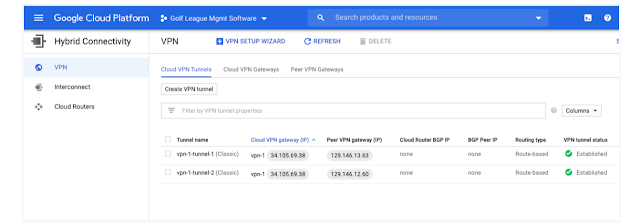
Go to VPN Page and check the provisioning status
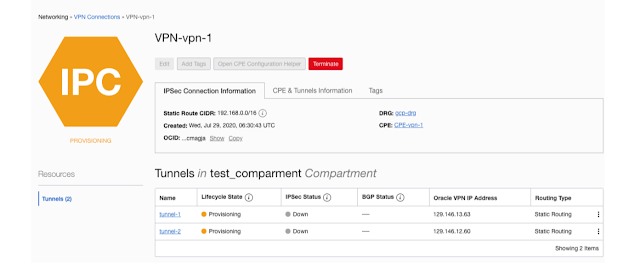
After some time the Lifecycle status should show as Available (green) but the IPSec Status will show as Down since we need to configure tunnels on GCP side by using the OCI tunnel IPs
Note down the tunnel IPs - 129.146.13.63 and 129.146.12.60
GCP - Configure VPN Tunnels
After running the VPN wizard note down the IP addresses of the tunnels and configure tunnels in GCP VPN
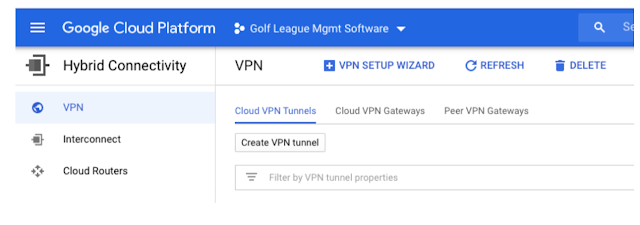
Click on Create VPN tunnel and select vpn-1 gateway created earlier
Enter one of the OCI Tunnel IP 129.146.13.63 as remote peer IP.
For IKE version select IKE2 (OCI supports both IKE1 and 2).
For Routing options select Route Based (OCI supports both link) and entered the CIDR of OCI private subnet (10.0.1.0/24) Note: at this point not clear if need to enter CIDR of VPC or Subnet
Pre Shared key (same as entered before for OCI) - ocigcpvpn
Repeat the above and create another tunnel and enter the other OCI tunnel IP - 129.146.12.60
OCI - change the IKE version to 2
By default OCI VPN wizard selects IKE1 but the default for GCP is IKE2. So make sure you select the same. To edit OIC to to VPN page and edit both the tunnels and select IKE2.
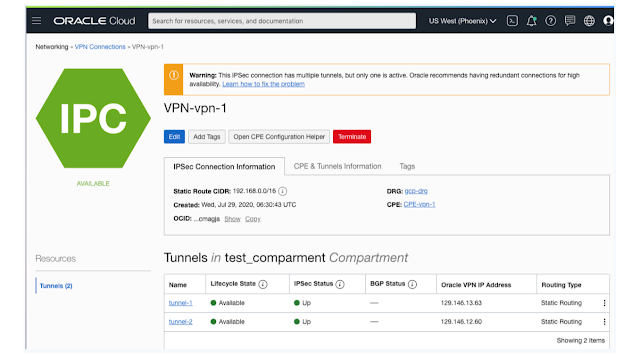
After some time (few mins) you should see IPSec Status up (green) for OCI and established for GCP
Route Config
GCP
The configuration of tunnels automatically creates routes and configures them. You don't need to create these.
OCI
Firewall Config
OCI
Ingress
Egress
GCP
Verification
GCP to OCI
SSH into GCP VM and ping the VM on OCI on private IP address
mbhasin@instance-1:~$ ping -c 3 10.0.1.2
PING 10.0.1.2 (10.0.1.2) 56(84) bytes of data.
64 bytes from 10.0.1.2: icmp_seq=1 ttl=62 time=172 ms
64 bytes from 10.0.1.2: icmp_seq=2 ttl=62 time=170 ms
64 bytes from 10.0.1.2: icmp_seq=3 ttl=62 time=170 ms
--- 10.0.1.2 ping statistics ---
3 packets transmitted, 3 received, 0% packet loss, time 5ms
rtt min/avg/max/mdev = 169.614/170.420/172.013/1.222 ms
OCI to GCP
SSH to VM on the private subnet (through bastion host) and ping the GCP VM in private IP
ssh -t -o ProxyCommand="ssh -i ./ssh-keys opc@158.101.4.85 -W %h:%p %r" -i ./ssh-keys opc@10.0.1.2
[opc@instance-1 ~]$ ping -c 3 192.168.0.2
PING 192.168.0.2 (192.168.0.2) 56(84) bytes of data.
64 bytes from 192.168.0.2: icmp_seq=1 ttl=62 time=170 ms
64 bytes from 192.168.0.2: icmp_seq=2 ttl=62 time=169 ms
64 bytes from 192.168.0.2: icmp_seq=3 ttl=62 time=169 ms
--- 192.168.0.2 ping statistics ---
3 packets transmitted, 3 received, 0% packet loss, time 2002ms
rtt min/avg/max/mdev = 169.542/170.008/170.899/0.714 ms
Conclusion
This blog demonstrated steps for configuring site-to-site VPN connectivity using out-of-the-box support features. Using simple configuration as outlined above one can easily configure secure connectivity.


No comments:
Post a Comment